Pictures:

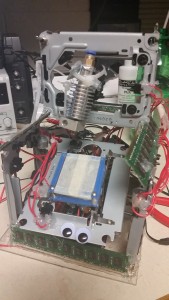
^ RAMses in it’s current state; defunct. I scrapped some bits and pieces for modifications to the Velleman Vertex I’m building, but most of the structure is still there.
^ A test run of the axes. This is the only video of the axes running before the machines untimely demise.
Skills used:
3D Printing, Hardware Hacking, Electronics, Mechanical Engineering
Description:
While working on the massive Dynamo Death printer, I got horribly bored and decide to take a break from building the printer… and building another printer.
If you’re like me, you like to have an objective of everything you do (even if that objective is “Because I freakin’ can!”). And the objective of this build was to build a 3D printer as cheaply and quickly as possible.
I went from having all the parts on my desk to a working CNC machine compatible with Repetier in about 6 hours, and had filament extruding in another 2. The total cost came out to roughly $40-60, but I had most of the stuff lying around. Unlike my other printers, I didn’t care about quality, and just wanted it to work. If something broke off, I just hot glued it back together (the way real engineering should be).
Aside from approximately one (1) metric crapton of hot glue to hold the thing together, I scrapped the endstops, motors, and each axis from 4 separate desktop optical disc drives. I used the PISCES 3D printer to make a very minimal Bowden extruder that is basically just a bearing mount with a tension spring and a screw hole, and a I used some spare RAM lying around as structural components. The bed itself was made of laser cut acrylic coated in blue painter’s tape. As I have no heated bed, the only material I have half a prayer of running is PLA and maybe PETG, but whatever. After that I slapped on some Industrial grade googly eyes for good measure and spun her up.
This may be one of the worlds smallest FDM 3D printers, with a build area of 35*35*25 mm. However, with a build area like that, all you will really be able to effectively print is a Ring. Maybe. perhaps A Cherry MX key cap? Not much.
Update: I changed the drivers to A4988s to DRV8825s for more precision, but, blinded by the light of my infinite genius, I forgot to reset the potentiometers, and all of the stepper motors blew out in about 3 seconds. I have spares, but I have to rewire them. Rest in Pastrami, little fella.
Pros:
- 5 GB of RAM! That’s more than most of VT’s computers!
- Dirt cheap demonstration of CNC principles.
- Quick 6 hour build.
- A hell of a lot of fun to build.
Cons:
- Fragile; has broken twice
- Resolution is extremely poor.
- Miniscule build area renders this more of a proof of concept than an actual working printer.
Opportunities for improvement:
Seeing as how this build was a joke to begin with, its hard to think of things to do to make it a better joke. Perhaps I should use a smaller hot end so I can get a larger build area, or use different axes.
Conclusion:
With 3D printers getting more and more hyped, the price is dropping greatly, and for people that just want to see the concept in practice (like a high school), this is a pretty stupid and silly way to make it happen. TL;DR: it works, but not well.